Quilted Pineapple Cushion Cover QAL – Day 2
We hope you had fun sewing up the HST in Day 1 of cutting & sewing. Today, we will be putting the patches together to complete the Pineapple patchwork top.
Step 1) Layout Instructions:
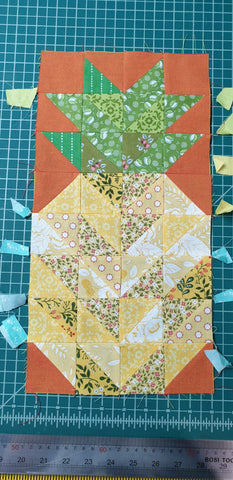
On a flat surface, place your 30 HST and 2 units of 2.5″ square background fabric following this layout below.
IMPORTANT: note the direction of the diagonal HST units.
– Please 1 unit 2.5″ square on the left and 1 unit on the right of Row #1 (Top). – On the 2 columns on the RIGHT will have the diagonal seams going from top right to bottom left, and the 2 columns on the LEFT will have the diagonal seams from top left to bottom right.
– EXCEPT for the extreme left and right patches on Row #4, the seams will go in the opposite direction of their neighbouring units.

Tip: After you have completed the layout, take a picture to remind you of how you have placed your pieces, in case the breeze/cat/kids decide to shuffle the pieces for you.

Step 2) Sew units into pairs and then into rows
– Working with 1 row at a time, pair the adjacent units. Pinning or clipping them on the SEAM side will remind you which side to sew. (See Row #2 below)
– Join the 2 sewn pairs to complete the row. (See Row #1 below)


Step 3) Pressing direction
– Working 1 row at a time, bring Row #1 to the ironing board and press ALL the seams to 1 side. In this case, press all the seams to the LEFT.
– For Row #2, press the seams to the RIGHT.
– Do the same for the rest of the rows, alternating the directions for each row.


Step 4) Pressing direction
– Working 1 row at a time, bring Row #1 to the ironing board and press ALL the seams to 1 side. In this case, press all the seams to the LEFT.
– For Row #2, press the seams to the RIGHT.
– Do the same for the rest of the rows, alternating the directions for each row.
Step 5) Join Rows
– Join Row #1 to Row #2, matching the starts and ends of the rows and NEST the seams on the 2 rows together. Pin or clip the matching points. They should nest/match nicely because you have pressed the seams in the opposite directions in the previous step.


– Sew slowly and remove pins as you approach the footer.
– Join Row #3 to Row #4,
– Join Row #5 to Row #6
– and then Join Row #7 to Row #8
You now have 4 pairs of Rows.
– Join Rows 1+2 to 3+4,
– Join 5+6 to 7+8
Then join the 2 halves together to complete the block.
PRESS ALL SEAMS OPEN.
Tip: We sew in pairs instead of adding 1 row at a time building to the complete block. This way of organisation allows you to handle the patches in smaller chunks, and you don’t need to work with big pieces over prolonged period of sewing sessions. This means that you get less distortion of your patchwork and your patches will fray less as there is minimal handling.
Step 6) Prepare borders
From your background fabric, cut:
– Top and Bottom borders, cut 2 strips: 8.5″x 2.75″
– Right and Left borders, cut 2 strips: 6.75″x 21″


Step 7) Join borders
– Attach Top and Bottom strips to the Pineapple Block
– Press both seams OPEN
– Attach Left and Right strips to the Pineapple Block
– Press both seams OPEN.


Your top is now complete! We will finish the instructions to complete the quilting and pillow construction this Friday, 18 Jan.
Do follow us on Instagram, Facebook page and Facebook Group (Quilting Quilters) and please share your progress pictures with us too! Remember to add hashtag #2QQAL2019 #PineappleQAL
